GeoWorlds Project, Distributed Scalable Systems Division
University of Southern California Information Sciences Institute
![]()
![]()
![]()
|
GeoWorlds Project, Distributed Scalable Systems Division
|
|
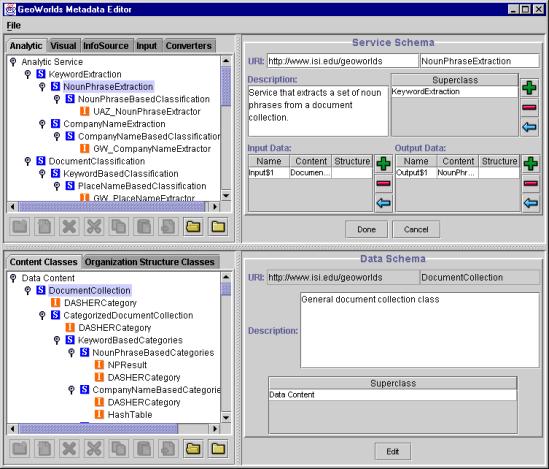
The Semantic Description Tool allows system engineers to prepare semantic-level metadata about software components that include descriptions of the functionality, input/output data semantics, and other core properties of the components. By using the tool, ontologies of functionality and data semantics can be defined, and individual metadata schemas can be edited. The following picture shows a screen shot of the metadata editor. The upper part of the window is for editing service components (analytic, visual, information source, user input, and data conversion services). The lower part is for editing content and structure semantics of data. In both cases, the left side displays the ontology hierarchy and the right side provides forms to edit schema or instance property values.
1 Define functional and data ontologies (abstract components)To register a service component to the GeoWorlds system and make it usable by the service composition tool, the user needs to select or define appropriate functional and data ontologies where the service component and its input/output data descriptions can be classified. 1.1 Add a new functional ontologyTo add a new functional ontology, the user needs to decide the type of the service among the GeoWorlds' five top-level service categories: analytic, visual, information source, user input, and data converter services. After selecting
a corresponding tab, the user needs to decide the position of the new ontology within the taxonomy
hierarchy. A new ontology can be created and located under the selected position by pressing
the New Schema (
1.2 Add more subsumption relationsThe schema editor allows users to define more than one subsumption relations with other schemas. To add another subsumption relation to a schema, the user needs to select a subsuming schema on the ontology graph and press the Add (
1.3 Define input / output data semanticsWhen a new schema is created, the I/O data descriptions inherited from its parent schema will be automatically included. A data description is composed of two parts: content and structure descriptions. The content description represents the semantics of data content and the structure description represents the semantics of data organization structure. The user can specialize the I/O data descriptions or add more descriptions. To specialize the content or structure semantics of a data description, the user needs to select the corresponding cell in the I/O description table, choose a specialized content or structure schema from the data ontology graph, and press the Enter (
To add more data descriptions, users can press the Add (
If there is no appropriate ontology to describe the semantics of the service I/O data, the user needs to create a new content and/or structure schema(s). The way to create a new data schema is similar to the way of creating a functional schema. Please refer to 2.1.1 and 2.1.2 for details. 2 Classify a service instanceAfter defining required functional and data schemas, users can classify a service instance under the functional ontology. To do this, users need to press
the New Instance (
Syntactic information of data items can be described by their data instances and ordering between them. To specify data instance, the user needs to select the syntax column of a data item, select an appropriate data instance, and press
the Enter (
If there is no appropriate data instance to specify syntax of a data item, a new data instance that can syntactically represent the data item
needs to be implemented and classified. To classify a data instance, users need to locate the appropriate ontology node on the data graph and press
the New Instance (
3 Save and load a resource descriptionThe component semantic description can be save to an XML file. If the user selects Save menu in the File main menu, the description will be saved to the default metadata file GeoWorlds/Client/GeoWorldsResource.xml. A new file path can be specified by selecting Save As menu in the File main menu. Saved resource description can be loaded back to the resource description tool by selecting Open menu in the File main menu.
|
|
|